Some simple canning
Well, I can’t imagine anyone really wants to go outside right now, and we are all buried in windfall fruit, so let’s finally get to a basic canning post. Canning is a process by which we are putting things safely into bottles- confusing, I know.
At this time of year I’m dealing with all sorts of bits and bobs, many of which are tiny, somewhat damaged, amounts of fruit and veg. Often I am picking somewhat large amounts of tomatoes at once. When I have a spare afternoon, I whack it all into bottles for use later in the year.
Apples
Apples are one of the harder fruits to bottle, and once you are keen on bottling them you will suddenly think a lot harder about which apple variety you have.
Some apples (most, frankly) will not tolerate the heat required for safe canning. They fluff up and don’t hold their shape. It depends on your personal taste about what to do here- you can use them solely to make applesauce (in which case, follow this recipe but mash them up), you can not worry about the fluffiness, or you can… find something else to do with those apples.
To test if your apples will go fluffy, just chop one apple up and put it on the stove in some boiling water, keep it boiling for 5 minutes. If it goes fluffy, your entire batch will- if it holds its shape, you are in business.
You don’t need to worry too much about how many apples you have, because you just adjust your jar and liquid number to suit. Picture the chopped apples sitting in your jar, filled to the top, and about 1/2 to a full cup of liquid for each jar as well. Get extra jars because you don’t want to be caught short!
You need-
Good, clean jars with perfectly unmarked/undented lids- you can buy them (specifically canning jars) or I reuse peanut butter/jam jars
Sugar- 1/2C sugar
Big saucepan- 5L capacity
Small saucepan- 1L capacity is fine
Oven set to 90 degrees C
Huge stockpot or pressure canner (not a pressure cooker- a pressure canner)
Apples!
Set up
Check all of your lids to make sure they are fully unmarked. Throw out any that aren’t perfect- they won’t make a good seal.
Bin both of these.
Wash all of your jars and lids with hot soapy water. Put the jars in the oven and the lids in the small saucepan, covered in water with a lid, and leave it to stay just below boiling (they will be sitting there a while, don’t worry about bringing it up to temperature at any speed).
Boil the jug what feels like a million times and fill your huge pot. You can use non-canning pots for purpose- they just have to be big enough- the only thing is that the jars can’t sit directly on the bottom of the pot, so you need something metal which will raise them a little bit up. In a pinch, I have used a teatowel, but before I got my canner I used a heat pad (so you can put a hot pot down on the table/bench without damaging the bench) or rice pad (which you sit a pot on top of, on the element, which makes the element a touch cooler than the lowest setting). The water in the pot needs to be about 90 degrees by the time you are adding your apples. It can take forever!
In a large saucepan (the third saucepan) you want to put your sugar, 5 litres of water, and get it just below boiling (lid on) while you prep your apples. This is your sugar syrup.
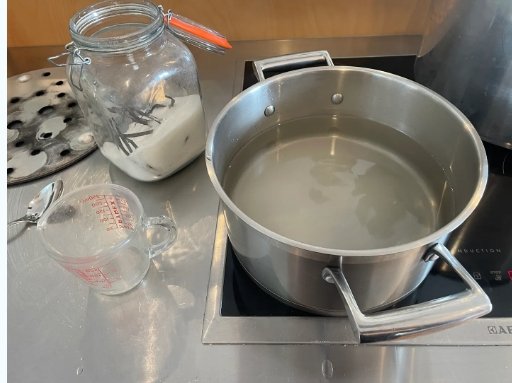
Big saucepan making my sugar syrup- note that I’ve left quite a bit of space in the pan so my apples fit in.
The setup-

Big canning pot, smaller sugar syrup pot, lid pot tucked behind. Teatowel for hot jars at the fore, but at the rear the jars are waiting to be filled. More teatowels and scoopers than you’d think you need, because you don’t want to be caught short when holding something hot.
Prep your apples
Windfall apples are great for this. I chop all of the manky bits off and set off-
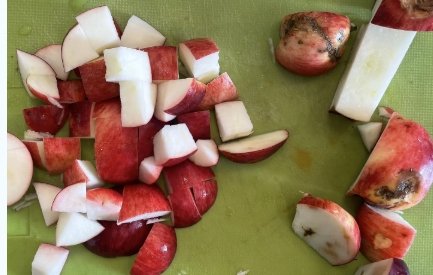
Manky bits in a bucket, good bits into a big bowl
Now you have some options-
You can chop all of your apples, sprinkle a bit of lemon juice over them, and pile all of the chopped bits up in a few bowls- or you can chop as you go. I sort of do a bit of both. Either way, every time you do a ‘batch,’ you want to process about a 2L of chopped apples at a time.
Processing
Once you have the apples chopped, at least a 2L containers worth, gently add them to the saucepan of near-boiling sugar syrup, bring it to the boil, and leave for 5 minutes.
Just before your timer goes off, pull some jars out of the oven (and their matching lids out of the saucepan), and once the timer goes off quickly, gently, spoon the hot apples into each jar. Top up with the liquid. Leave 1cm of ‘headspace’ (just air) at the top of the jar, wipe the rim of the jar so there is nothing sitting on it, and firmly put the lid on (don’t tighten it as hard as possible, just gently/firmly).
Your first batch of apples is done and can sit in the big canning pot, while you repeat until you have done all of your apples.
At some points you may need to top up your sugar syrup- remember, 1/2 cup of sugar to 5L water, or 1/4C sugar to 2.5L water if you are heading towards the end of your canning session.
Once you have processed all of your apples, they need to gentle boil in the canner for 20 minutes. This means that the water in the canner needs to be boiling before you start the timer! Lid on the canner. It doesn’t have to be a fierce, jar shaking boil- but it does need to be a bubbling boil.
After 20 min, turn off the heat to the canner and let them sit for 5 minutes before carefully getting the bottles out of the canner and leave them to cool off. Voila!

Many thanks to Lesley for being my Canning Buddy that day- my apples are pink, hers are yellow <3
End of season tomatoes with dried chickpeas, lentils
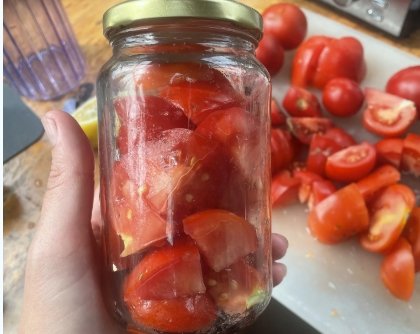
I was going to ‘dry pack’ these, which is processing without water, hence the lid. But I wussed out because it’s a bit too technical. Nice photo, though. About 3 tomatoes to a small jar, if that helps your Jar Maths.
I can literally a few jars of tomatoes at a time with the same method, but in order to make the batch worthwhile I also can some chickpeas and lentils.
Using this method, I 1/3 fill some jars with either dried lentils or chickpeas, then top up to 1cm below the jar lid with boiling water. Put those in the canner- they need 45 minutes boiling- so I put them in while filling the canner with boiling water- it doesn’t really matter if they sit in there a bit longer. I count out how many jars of tomatoes I will get, and make up jars of the dried chickpeas to fill out the rest of the space in the pan. So if I can fit 7 jars in the pan, and only have 2 jars of tomatoes, I make up 5 jars of chickpeas. This is a totally optional thing to do, but because canning takes a while, and ready-to-add chickpeas/lentils are really handy, I reckon it’s a good idea!
Prep the canning saucepan first as it can take a really long time to get hot, remember to put something in the saucepan on the bottom so the jars aren’t sitting directly on the bottom of the pan. Fill it with boiling water (or hottest tap water, and wait longer).
You need-
Some tomatoes, at least 2 cups
Lemon juice- 1 tablespoon for every 2 cups of tomatoes
Dried chickpeas and lentils if canning them at the same time
Good, clean jars with perfectly unmarked/undented lids- you can buy them (specifically canning jars) or I reuse peanut butter/jam jars
Big saucepan- 5L capacity
Huge stockpot or pressure canner (not a pressure cooker- a pressure canner)
Wash the jars and lids in hot soapy water. For this method, I put the lids in a big bowl and pour boiling water over the top, instead of putting them in a saucepan.
Chop the bad bits off the tomatoes and add to the jars. Squish them in a little bit, and make sure they are sitting below 1cm from the top of the lid. Add lemon juice to match the jar size- for a 250mL jar, 1/2T lemon juice, 500mL, 1T lemon juice, and so on.
Fill the jars up to 1cm from the top with boiling water and add to your canning saucepan. They need to be in boiling water for 40 minutes (500mL or smaller jars) or 45 minutes 1L or larger). So pretty much the same time as the legumes.

My tomatoes waiting for their lids- behind- this is a one-saucepan job so much simpler and faster, I’m just using my usual stock pot here.
Once they’ve boiled for 40 min, leave them to sit with the heat turned off for 5 minutes before getting them all out.

That beautiful hand! Here are the chickpeas, post processing. As you can see, they swell up large and fill the jar.
-
I hope you find some joy in canning. If you have really small jars, it is easy to do on a tiny scale with little setup, and it got me through some punishing years as a single Mum with a tiny income. Now I am on a better income, I can afford the fancy things to make canning easier, but frankly I would never stop doing it. It’s a great skill to have!
A note for those who are interested- this guide differs only slightly from USDA rules and the ‘Ball Book’ of canning, and the only difference is that I will reuse perfectly fine jars without buying new. If you buy new jars and lids, the recipes above are per guidelines. ‘Kettle canning’ is very popular in NZ and something which is considered by many to be extremely dangerous in terms of food safety. I don’t want to have the argument (NZ is a place where botulism pretty much never occurs; botulism is the primary concern when it comes to canning safety). I like the safety of canning by the guidelines so I am able to give my produce away without causing worry for those who receive it!